Friday, July 20, 2012

We Fall Into Patterns Quickly

We've always loved the tile in the limestone farmhouse at Schact Farm. As soon as we started this project we knew that we wanted the same tile and pattern in our own house. Our thinking was that if the slate can handle the mess of an animal farm, then surely it can withstand our mess?

The slate was a deal at less than $2.50 sq ft. We ordered it from Penn Big Bed Slate Co. and had it shipped to Bender Lumber, who very kindly delivered it for free to our house (did I mention they didn't make a penny off of this transaction? Great business).

Here's what we were going for:

Clear natural cleft slate floor detail 

We really love this tile and pattern. Maybe as much as you can "love" something that doesn't live and breath .

Anyways, whatever you call our feelings towards this tile, it's good that we felt that way because boy was it about to test our commitment level.

First, this stuff is heavy. I mean, it's natural stone! Carrying it in from the pallet in the driveway was the first task. You can see there's about 6 different size tiles in the 10 sq. ft. pattern.


We thought we could just buy 1/8" spacers and call it a day. They didn't work.

Then we bought 3/16" and 1/4" spacers. Whaddya know, neither of those worked.

So we scoured Bloomington for 3/8" spacers. Found some, tried em', but they SUCKED. They don't make the kind specifically designed for offset patterns in that size, and the little cross-shaped ones just kept falling over. UGHHHHHHHHHHHHH.

I forgot to mention that Big Penn was closed for the weekend and that they don't send you any instructions with the tile (I had to call and have the pattern faxed to me). So, we turned to the only thing we knew that could help us in our time of need: Google. What were the two first answers to "slate tile and spacers"?

"Due to slight variations in tile size use of tile spacers is not recommended with slate tile." 

"Throw away your plastic tile spacers when laying slate."

(sigh). As soon as I read this, it reminded me of the same moment I had about 3 years ago when I Googled something like, "raising two puppies". The first responses that came up were "Absolutely avoid getting two puppies at once" and "Expert breeders are careful about placing two puppies together in one home, because they know how much work it is to raise both of them". Whoopsadaisy.

So, on to plan B. We ended up deciding to use chalk lines in the whole mudroom to make sure the pattern stayed straight and uniform, and then eyeballed laying out the tile. Our friend (and tile expert) Chris recommended laying out the whole room before officially buttering up the tile, so that's what Will and Guff spent a whole day doing:


Looks pretty good for no spacers, huh? 

The next job was to cut all the edge pieces, which Will did (I did my duty and asked him to wear safety goggles, but the most you can do is lead the horse to water...). The tile saw was loaned to us by Chris, who says that it is the "Cadillac" of saws and is envied by every tiler he knows. After using it, Will concurred about it's awesome-ness.

Once everything was cut and in place, Will and friends spent the next 3 days "back buttering" the tile after work. Thanks to Mandy, David, and Josh for the help!

Before sealing and grouting, we needed to clean it. Easy, right? WRONG. Two 300+ sq ft. scrub downs and some heavy acid cleaner spot checking later, we were finally ready to seal.

The most exciting part of the process was grouting, which we totally left up to the amazing grouting prowess of Mandy Corey (aka the most badass woman I know in Southern Indiana). Can you believe we finished in just 2.5 hours?


We cleaned and sealed it again (thanks Grandma and Grandpa Rose for the help!), and...VOILA! Check out our brand-spankin' new slate floors!!


 Joaquin especially likes it.

Sooooo glad to have this part of the project done. It was a grueling two weeks of work. Thank God we were finally able to move the washer and dryer out of the kitchen!

Now on to the upstairs...

Thursday, July 5, 2012

Dry Spell

We've got drywall folks.

Here's the loot, in all its glory.

 The boys spent a Saturday hanging it. This is the ceiling downstairs:


The most exciting part of drywalling for Will was finally being able to take the door off that separated the old part of the house from the new part of the house.

Remember this?

Sorry door, you are no more. It kinda looks dead the way it's just laying there.

Now we can see all the way through the house.  It was weird and exciting to have to start changing our mentality to thinking of the addition as part of our living space. It's just that it's been there sooooooo long, but has always been partitioned off.

 Here's the addition all drywalled:

And the stairwell:

The beanette's nursery hallway:

And our bedroom:


Drywalling is very tedious work, and yes, we are doing it ourselves (it's totally appropriate to call us crazy at this point). We managed to finish all the mudding and sanding in the mudroom, but are still trudging away upstairs. Thankfully though, we were able to paint the mudroom (Benjamin Moore HC-115 Georgian Green) last weekend with help from my dad and Travis and Ashlee:


Our next big task is tiling. Our friend Chris Elam (who drew up the plans for our house and also owns Sycamore Tile Works with his wife Emily...seriously, check them out and order some sweet house numbers as gifts for holidays and weddings!) lended his help and expertise to get us started. Will, Tim, and Chris were able to lay all the cement backerboard in just a few hours...an encouraging quick win after several weeks of drywalling with several more in sight:

Ummm, did I mention that neither of us have ever tiled before? Ever? 

This should be interesting...
Tuesday, July 3, 2012

Nostromo

10 weeks and counting.

And that's if all goes as we hope.

I'm 30 weeks this week and things are getting REAL folks. For REAL. Like, I can see her punch through my belly real (not to be confused with this kind of punching).

I've resolved myself to the reality that we likely won't have a pinterest-worthy nursery (ahem, hallway) by the time our sweet babe comes. Or a bathroom that doesn't require traversing a set of stairs to get to. And who knows what else I'm not thinking about (trim? light fixtures? air vents?). I know, I know, it's so hard being middle-class!

But I've also heard that you really only need a few things when baby arrives: boobs, a bed, diapers, and clothes. I think we can manage that. And in a way,  the simplistic approach feels kind of liberating.

I'm hoping to help as much as I can these next few weeks before my big ole baby belly becomes a liability (images of smeared paint swim in my head from a belly that just doesn't leave enough room b/w it and a freshly painted wall).

Yes, pregnant ladies can help with home projects. And we can take walks, stand and not use a chair, garden...pretty much all the normal stuff. Maybe I won't be able to trim my toenails soon, and DO NOT get between me and the nearest bathroom. But mud and paint and tile, I can.

I think I can confidently say that we will have painted walls and finished floors by the time she arrives. And I'll eat those words if she decides to make a surprise early appearance.

To be honest, I'm looking forward to being able to tell my children one day about this crazy adventure in our lives. I guess it's our version of "I used to walk 5 miles in the snow to get to school every day..."


Wednesday, June 6, 2012

We've Been Framed

Things have been moving forward at a dizzying pace on Wylie St. Will and I are expecting a little girl in mid-September, so we've been working hard to make sure the new addition is liveable for her and us by that time. Things are looking hopeful for that to happen, but we've still got a ways to go!

Planning a home addition and baby addition is a somewhat surreal experience. One moment I'm researching toilets, the next it's strollers (which I gave up on. SOAP BOX ALERT: Picking out things for a babe who isn't here is like trying to furnish a house you've never seen! Who came up with this system?!?!?!). Things swimming in my brain at any given moment include Janka ratingsbreast pumps, light fixtures, rocking chairs, tile sealer...I will spare you the rest of my madness. Oh, and then there's that whole labor and delivery thing. Yeh...

Life is FULL, but it's a good and exciting full. The light at the end (or is it the beginning?) of this proverbial tunnel is a sweet new babe (did I mention she's my first crush in 12 years?) and a new home. I'd like to have more of that swimming around in my brain. 

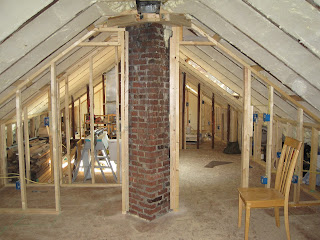
This is the knee wall in our back bedroom upstairs. You can see there will be a door in the middle so we can use the inside of the knee wall for storage:
 

Other side:

This is the closet. Should make for an interesting door!:

This is looking down the staircase. The wall for the back bedroom is on the right. The bathroom is on the left:

So maybe it's not conventional, but we're excited about it: Baby aka "Daisy", aka "Beanette" Rose will have her very own nursery hallway. Yup, a hallway. It's pretty spacious and is right next to our bedroom, so we can keep her close to us. She'll be right across from the bathroom too, which means a direct shot for mom and dad from poopy-cloth-diaper-baby-bottom to toilet sprayer (man, I bet you all are just loving all these details I'm giving you in this post):

Will installed a pocket door kit so that we won't lose any hallway or bathroom space to a door:

This is the hallway nursery's skylight. It'll get blinds so that the Beanette can sleep, although looking through it from a crib at night with all the stars in the sky would also be pretty rad:

This is the view from our new bedroom down the hallway (more knee walls on right, bathroom on left):

This is a shot of the bathroom from our bedroom closet. Although I couldn't decide on a stroller, I did choose a toilet:

Our bedroom:

Knee walls:

More knee walls. No storage back there though--it's all for duct work:

View from the back of our bedroom. I'm not quite sure yet if the brick will be painted and exposed, or painted and dry walled in. It's not really as cool as it looks and is pretty nasty. I definitely wouldn't want kids or animals touching it!:

I'm about a month or two behind on posts, so there is a lot more to show! We are getting ready for a phase of the project that doesn't really require any skills, so if you have time to spare and would like to help us out for an afternoon painting, just let me know! There's usually some Aver's or Naughty Dog in it for ya.

Saturday, April 28, 2012

Insulation

When we first moved into this house about 4 1/2 years ago, there wasn't an ounce of insulation in the entire house. Well, except for a pile of vermiculite ore insulation (likely laced with some tasty asbestos) in a pile in the attic above our bedroom. It was COLD. You could see the imprint of your foot on our wood floors during the winter b/c of condensation. The windows would flap back and forth, and I would shiver for about 3 minutes uncontrollably in bed before even being able to think about falling asleep.

We've taken some drastic measures folks. Drastic.

A few years back we had someone insulate the crawlspace. Now, during this major remodel, we replaced all the windows (no more flapping in the wind!) and put insulation into the exterior walls. Remember this?


The last thing we needed to do to make our house more comfortable was insulate the new addition and attic. We chose to go with spray foam insulation, which is some pretty crazy stuff.

We hired local Spray Foam Insulators to do the job, and they were great. We felt pretty bad for the guy that was doing the spray foaming because it was an unseasonably warm 80+ degrees in mid-march and he was having to spray foam that was 140 degrees in our hot little attic...with a jump suit on the whole time. By the end, he had totally soaked that jump suit through.

And here's a peek at our newly spray-foamed space:


We also put some insulation in the floors to help reduce noise between the upstairs and downstairs. You can see that they didn't shave it level towards the bottom of the roof because knee walls will be covering up that space.

Once that was done, we were able to start putting down subfloor.


In one of the next posts I'll show you the new floor along with our newly framed rooms!

Tuesday, April 24, 2012

Sister Wives

Remember this?


Yup, that's the attic. And yes, it's part of this giant remodel project. One day this will accomodate a master bedroom, bathroom, and hallway office.

Nowadays folks see the outside of the house and say things like, "The house looks soooooo good" or "You guys really worked hard! How does it feel to be done?". I'm not sure if it's more dejecting for those folks or for me to have to tell them we are no where near finished (and that the outside changes weren't even a part of the original plan!).

The most amusing experience I've had related to this was when a friend came over, walked inside our house, and said "Oh". Yup, you heard correctly. "Oh." Ouch.

We've been working hard though and should have some big changes to show in the coming months. 

Before we could put subfloor down in the attic, we had to sister the joists. This basically means nailing boards against all of the existing floor joists in order to reinforce them and level them out:

It took Will and friends several weeks to sister all of them. And once they had them sistered they still had to level the top of the wood (i.e. lots more backbreaking work by hand):

We also had to add some framing to the roof in order to reinforce it:

 The duct work went above it, which will eventually be drywalled in:

And more will go behind the space that will be enclosed by knee walls:

Not very exciting stuff...but all of this work is in preparation for a walkable attic space for the first time in the house since it was built in the 30s.